Create your first activity listing
You can create your activities by going to Admin > Activities. An activity can have multiple sessions happening throughout the day/ across different days.
This guide will cover:
Create an activity
There are four steps to follow when creating an activity.

Step 1. Information: This step contains all the basic information such as Activity Title. It also contains all the custom fields that you have configured in the Settings > Field configuration section. To learn more about customising activity fields, please read field configuration.
You can also add the following optional information:
- Cover image (optional): This will appear as a wide banner for each activity listing page. We suggest using some high-quality landscape or panoramic pictures for the best layout.
- Attachments (optional): You can upload activity-specific attachments. Users will be able to view and download these.
Step 2. Sessions: Create a session for each time the activity takes place.
You can easily create repeating sessions by utilising the Repeat function. Tickets for all sessions will be listed together on the activity page, so that users can buy multiple sessions across multiple days easily. We suggest limiting the number of sessions for a particular activity to 10-15 maximum for a better user experience. You can easily clone an activity (see next section) to create more sessions that happen in the future.

Step 3. Tickets: Create the tickets (and optional add-ons) available to purchase. There are three ticket types that you can create.
"All sessions" ticket: This ticket type will allow attendees to attend all sessions in this activity. If you enable the 'Pro rata' option, the price of the "all sessions" ticket will be calculated on a pro-rata basis that reflects the number of available sessions at the time of booking. For example, if you organise a 5-day holiday camp for £100 (all 5 sessions) from 14 Feb to 18 Feb, on day 2 (15 Feb), users will pay only £80 for the remaining 4 sessions.
Note: if you add/enable a new session after bookings are made, existing 'all sessions' ticket holders will automatically enroll in the new session.
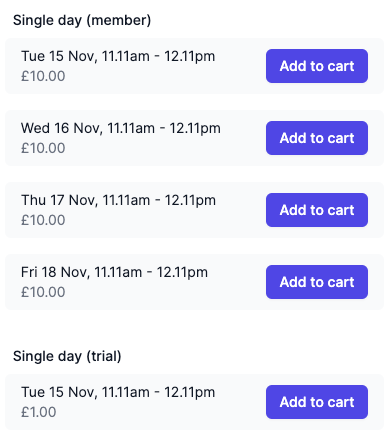
- 'Single session' ticket: This ticket type will be created for each session listed in this activity and attendees can choose which session(s) to book. Note: if you have created a few sessions, you do not need to create a 'Single session' ticket for each session. This ticket will be automatically replicated for all the sessions in this activity. In the example below, only one 'Single session' ticket named 'Single day (member)' is created.
- 'Subscription' ticket: This ticket type requires a subscription plan to be set up, and will enable users to book attendees into all sessions via a monthly subscription or payment plan. For more details on how to use Subscription ticket, please visit this article.
Advanced options
- Limit sales using this ticket (optional field): You can use this field to limit the sales using this ticket. If you have set a Place limit for any session, users can add a ticket to the shopping cart only if this ticket has not reached its maximum sales limit AND the session being booked has not reached its maximum place limit.
- Restrict ticket to specific sessions (optional field): This allows you to restrict a single session ticket to be available only for selected sessions, rather than all the sessions you have created. The example below sets a new trial ticket which is only available for the first session.
- Override session time display (optional field): This allows you to change the display session time when users purchase this ticket. For example, if you have created a session with a start time of 16:00 and an end time of 17:30, but would like to offer the option for users to purchase tickets that cover 16:00-17:00 and 16:30-17:30, you can create two tickets and override the session time display for each. Sales from both tickets will still count towards the place limit for each session so you will not exceed your set place limit.
Add-ons (optional)
For Standard and Premium plan subscribers, you can create additional items for users to purchase along with the tickets (e.g. early drop off, late pick up, signed book). Each Add-on created will apply to each individual session and should be priced per session. You can also restrict add-ons to be only available for specific sessions.
Step 4. Settings: Configure other additional settings for the activity.
- Discount rules (optional): You can create new rules or apply existing rules. For more details on how to configure discount rules, please visit this article.
- Session pass (optional): You can apply existing session passes. For more details on how to configure session passes, please visit this article
- Payment method restrictions (optional): You can restrict payment methods available for users to purchase this activity. Leave empty if there are no restrictions (users will be able to pay by any methods that you have configured in payment settings)
- Booking opening and closing time (optional): You can set the booking opening and closing time. Booking opening time is set as a specific date and time. Booking closing time is set relative to the start time of each session (e.g., you can configure it so that bookings will be closed 1 hour before the session starts).
- Visibility & access (optional): You have the option to hide the activity from appearing on the homepage listings of the site. Also, you can set-up a password to restrict access to a particular set of users.
- Age restriction (optional): For certain activities with age restrictions, you can set the allowed range based on age on session date or date of birth range. For more details, please check out this article.
- Confirmation email (optional): You can include a customised message related to an activity, which will be included in the email confirming their booking (e.g., venue information, equipment reminder).
- Status: Users can only view and purchase Enabled activities.
Review your activity page
Once an activity is created, you can review it by clicking on the public page button on the activity detail page.

Alternatively, you can always go to the public booking page to view how the activities will appear to your customers. To do that, click on Back to site in the Admin area.

Navigate around the activities tab
After you have created activities, they will be shown on the activities tab. You can organise it by activity, by session or in a calendar view.
- Configure: The Configure button allows you to control the filters you can use to filter activities. Please note that not all fields can be used as a filter (e.g., a long description text cannot be used)
- Register: This allows you to generate a register for a particular session. You can configure what fields to show in the register, and download/ print for your staff to use on the day of the session. For more details on how to configure a register, please read Manage session registers.
- Clone (Activity list view): Clone button allows you to clone an activity, saving you time. Information you have put in, such as Title, Description, Pictures, Attachments will all be cloned. Sessions in the old activity will not be cloned. Please make sure there are no duplicated sessions vs. the original activity.
- Delete/ Disable (Activity list view): Both buttons will make this particular activity invisible to the user. Deletion cannot be reversed and you can only delete an activity if there are no bookings associated with it. To delete/ disable a particular session, you can click on "Edit" and then delete the session from that activity.