Manage attendance registers
This guide will walk you through how to generate an attendance register so that you can use it to find attendee information, track attendance, and download/ print it as a check-in sheet to use on the day of the session.
Single session attendance register
In the Activities tab, click on 'Session list'. This will order all the sessions chronologically. Use the filter above if you want to look for particular sessions. Then click on the Register button toward the right. This will generate a register for you for that session. You can also click on Register in the 'Activity list' view. This will bring up the next immediate session's attendance register for that activity.

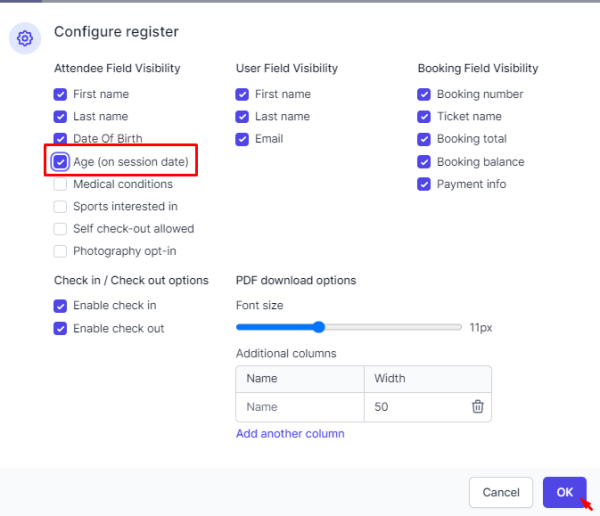
In the attendance register, you can click the Configure button to change what attendee/user fields you want to include on the register. You can also include additional booking details such as add-on items, outstanding balance, etc. You can then click the 'Download' button to export the register. You may need to test a bit on the font size to make sure all information can fit in one row, particularly if you have some field names that are relatively long. If you are struggling to fit everything on one page, consider changing the field names to shorter ones, and utilize the Helptext for the field to give more context. For downloads, you can also add additional columns to the downloaded registers to leave extra space for offline use (e.g., additional notes).

Attendance Tracking
For Standard and Premium plan users, you have the option to use Pembee to track attendance status, including check in and check out.
To enable attendance tracking, click Configure in any attendance register and you can choose to enable "check in" and/or "check out" depending on your needs.

A: A summary of how many attendees have checked in and checked out for this session.
B: Filter by "Checked in" or "Checked out" status
C: Button to perform the "Check in/out" action
D: Expand a detailed log of each "Check in/out" action and time. You can also cancel any actions that are created by mistake.
Multi-session attendance register
After opening any register, you can add additional sessions to be included in this register, for example, by including all sessions happening in a week to give you a full-week view. You can do so by clicking on the Sessions dropdown button, and choosing additional sessions to be included in this register.


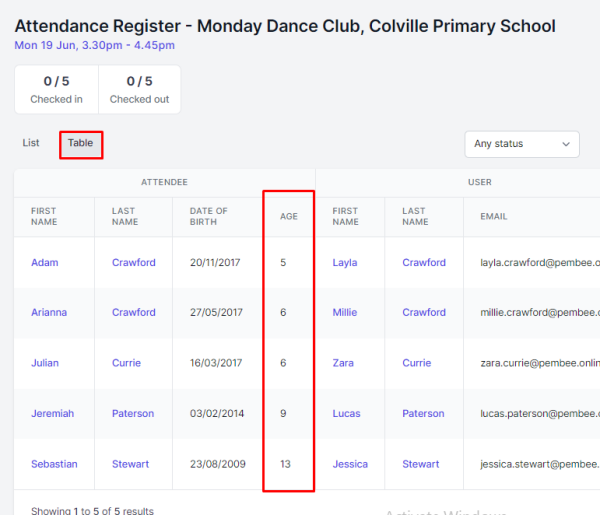
Display of Age column
The Age column on the Attendance Register automatically calculates an attendee's age based on their Date of Birth. You can use this to check the age the attendee will be when they attend the activity session.
Select > Configure
Put a check box ☑ then Select Ok to save
Click on > Table and it will display the Age column.